
I adore a soaked cake. Whether it be a flavored simple syrup, a warm coconut milk, unset Jell-O or pudding, caramel or sweetened condensed milk, pouring liquid over your unfrosted cake layers adds moisture, flavor and sometimes color to even the most plain-Jane sheet cakes, layer cakes and cupcakes.
Tres leches cake may be the most famous of the soaked cakes, drenched as it is with three kinds of milk (evaporated, whole and sweetened condensed), but homemade poke cakes deserve a lot more play and I'm here to show you why.
Traditionally, a poke cake calls for a store-bought white cake mix, a tub of Cool-Whip, and a box of Jell-O or pudding (not surprisingly, it was in a 1970s Jell-O advertisement that poke cakes were first introduced to the American consumer).
The cake is baked and then, while still warm, poked with the end of the handle of a wooden spoon. Next, the Jell-O powder is combined with hot water and poured into the holes created by the spoon (once sliced, these "holes" give the cake its signature - and arguably magical - "striped" appearance. The cake chills and is generously topped with Cool Whip before serving. Full disclosure, I have made a poke cake in just this way, with strawberry Jell-O, no less, and although the warm liquid Jell-O might give some pause, this traditional poke cake is, in fact, quite a pretty and tasty treat.
But here's the thing: With a simple one-bowl vanilla cake, an easy from-scratch soak and a batch of freshly whipped cream, an equally beautiful and even more delicious homemade poke cake can be yours.
Here are my poke cake assembly 101 tips, which, if followed, ensure success every time.
n The best soak: I love soaking my poke cakes with thick, but pourable, fruit purees for gorgeous stripes of color and summery flavor. A blender will do, but if you have a Vita-Mix, use it to quickly puree the softened, slightly cooked fruit. I also dig a poke cake with a sweetened condensed milk soak. It doesn't add much color, but the moisture, creamy taste and glossy texture make it a great option. Salty caramel sauce is also lovely, as is an alternative milk, such as coconut.
n The best cake: I like a yellow or white cake because the color of the soak shines through, but a chocolate cake with a caramel soak would be fantastic, as would a bright yellow lemon cake with a strawberry puree soak.
n The best tool for poking: The traditional (and ideal) utensil for poking is the end of the handle of a wooden spoon, about 1/4- to 1/2-inch in diameter. Avoid a spoon with a rough or worn end, which when thrust into the warm cake, is likely to hold onto crumbs even once the spoon is pulled out. A wooden spoon with a smooth, even painted end, or a plastic or silicone spoon with a rounded handle, makes for cleaner holes. And be sure not to use a super skinny poking tool, such as a chopstick: The best soak distribution is achieved with wider holes.
n The best poking technique: In a perfect poke-cake world, the top of your cake should be covered in holes, each about an inch apart. And the soak should fill the holes from the top of the cake to its bottom, for beauty and maximum moisture and flavor. To achieve this, and to avoid the dreaded half-soaked hole, you must plunge the spoon handle into your cake until you all but feel it touch the bottom of the pan. The cake must be warm for optimum soak absorption, but that can mean that once you remove the spoon from the hole, the cake may start to close back up. Poking your cake a second time, therefore, ensures the soak will properly fill each hole. If cake sticks to your poking tool, use a damp cloth to wipe it off after each poke.
n The best way to soak: Once poked and soaked, a rest in the refrigerator for 2 hours and up to overnight is key to produce a cake with pronounced stripes of color and flavor. (Some say the cake is even better the second day.) If you pull the cake from the refrigerator too early, the soak might leak as you slice it.
n The best toppings: A traditional poke cake calls for plain Cool Whip, so I top mine with lightly sweetened vanilla whipped cream. However, you do you, and if you'd like a lemon whipped cream atop your blueberry poke cake; or a chocolate whipped cream atop your caramel-soaked poke cake; or a malted milk whipped cream atop your sweetened condensed milk-soaked poke cake (yum), go for it. I don't recommend topping in buttercream, however, because the cake has already been sweetened by the soaking, and a sugary frosting might make it cloyingly sweet.
n The best way to slice: To showcase a poke cake's stripes in all their vibrant glory, I recommend slicing the cake right through its rows of soak-filled holes. Thus, before you top your cake with whipped cream, take a gander at where the holes are located and maybe even make a few tiny little marks on the sides with a paring knife. Then, once the cake is topped, use the marks that you made as a guide when slicing and voila: stripe-y, moist cake for all.
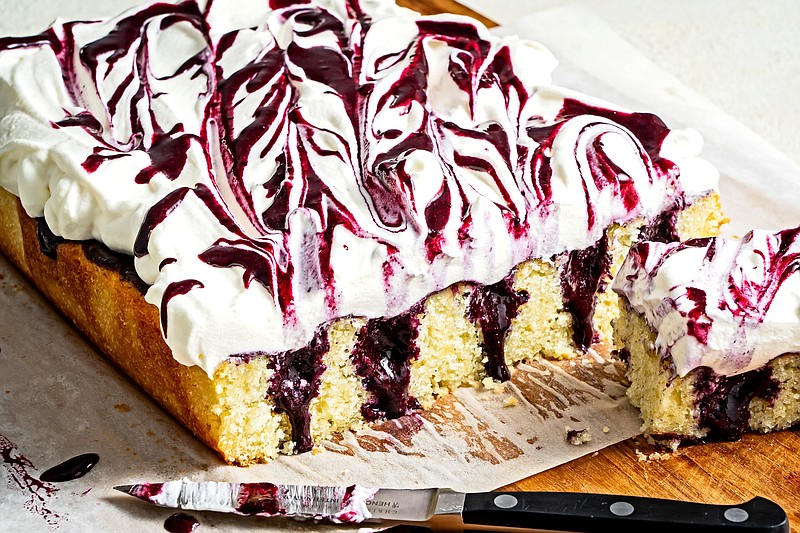
Blueberry Poke Cake
Active time: 30 minutes Total time: 1 hour 10 minutes, with 2 hours' cooling time
12 to 16 servings
This moist and fluffy vanilla cake is poked while still warm, and then filled with a slightly sweet blueberry sauce. After chilling, the cake is topped with a blueberry-streaked whipped cream and the result is the ultimate sweet trifecta of cake and cream and berries in every bite. The cake is made with a combination of melted butter (for flavor) and oil (for moisture), and may become your go-to vanilla cake.
The poking of the cake takes a bit of time. Your poking utensil - ideally the end of a smooth-handled wooden or silicone spoon with a diameter of 1/4- to 1/2-inch - should be round, not flat. It may have a tendency to get a bit sticky, poke after poke, so be sure to wipe your utensil in between pokes, and you'll be fine. Also, use a utensil that's smooth, not rough or worn (as the latter will likely to hold onto cake crumbs). This process might be a little messy, but this berry-filled cake is worth it.
NOTE: This versatile blueberry puree can be refrigerated for up to 3 days. It's also great in smoothies and cocktails, or it can be spooned atop ice cream, yogurt, pancakes or French toast.
Storage Notes: Refrigerate in an airtight container for up to 3 days. The unfrosted cake can be frozen for up to a week.
FOR THE BLUEBERRY PUREE
3 cups (420 grams) fresh or frozen blueberries, plus a handful of fresh for decorating, if desired
3/4 cup (180 milliliters) water
1/2 cup (100 grams) granulated sugar
1 tablespoon cornstarch
1/8 teaspoon fine salt
2 teaspoons fresh lemon juice
FOR THE VANILLA CAKE
Cooking spray or softened butter, for greasing the pan
1 2/3 cups (333 grams) granulated sugar
1/2 cup (120 milliliters) vegetable oil
1/2 cup (4 ounces/113 grams) unsalted butter, melted and slightly cooled
1 tablespoon vanilla extract
2 large eggs, at room temperature
1 large egg yolk, at room temperature
1 3/4 cups (420 milliliters) buttermilk, at room temperature
2 teaspoons baking powder
3/4 teaspoon baking soda
1 teaspoon fine salt
2 2/3 cups (308 grams) cake flour
FOR THE WHIPPED CREAM
2 cups (480 milliliters) heavy cream
3 tablespoons confectioners' sugar
2 teaspoons vanilla extract
Make the blueberry puree: In a medium saucepan over high heat, stir together the blueberries, water, sugar, cornstarch and salt. Bring to a boil and cook, stirring occasionally, for about 5 minutes. Reduce the heat to medium-high and simmer until the puree thickens and the berries begin to break down, about 15 minutes, adjusting the heat as needed to maintain a gentle simmer. Remove from the heat and let cool for about 5 minutes.
Transfer the puree to a blender and blend on medium-high speed until thick and pourable. Pour the puree into a 2-cup liquid glass measuring cup with a spout, if you have one, or a spouted pitcher, and mix in the lemon juice. Set aside 3 to 4 tablespoons of puree in a small bowl.
Make the cake: Position the rack in the middle of the oven and preheat to 350 degrees. Grease a 9-by-13-by-2-inch baking pan with cooking spray or butter. Line the pan with a sheet of parchment paper with a generous overhang on the long sides.
In a large bowl, whisk together the sugar, oil, butter and vanilla until thick, glossy and thoroughly combined, about 30 seconds. Whisk in the eggs and yolk, one at a time, ensuring each is incorporated before adding the next. Whisk in the buttermilk, followed by the baking powder, baking soda and salt, one at a time, vigorously whisking after each addition. Using a sifter or fine-mesh strainer, sift the flour over the bowl and whisk until almost smooth; a few small lumps are OK.
Scrape the batter into the prepared pan, and lightly drop the pan on the counter a few times to pop any air bubbles. Bake for 30 minutes, rotating the pan halfway through, until a cake tester comes out with a moist crumb or two, the cake bounces back when lightly pressed with your finger and is just starting to come away from the sides of the pan.
Transfer the cake pan to a wire rack and immediately begin poking the cake with the end of a wooden (or silicone) spoon (see headnote). The holes should be about 1 inch apart and should evenly cover the entire top of the cake. Press the spoon handle into the cake until it feels like you may have hit the bottom of the pan. Depending on your poking utensil, you may need to wipe off the end with a damp cloth after creating each hole, as the cake crumbs may stick to it. If some of the holes (or all of them) look like they've closed up a bit after you've poked, gently re-poke them. Spoon or drizzle the puree into the holes, filling each one up. The cake absorbs the puree quickly, so refill the holes with the puree until you run out, or until the cake seems adequately filled. (see NOTE)
Refrigerate the cake, still in its pan and on the cooling rack, for about 2 hours, or until the bottom of the pan is cold to the touch. Or, if you're feeling impatient, freeze for 30 to 45 minutes.
Make the whipped cream: When ready to serve, in the bowl of a stand mixer fitted with the whisk attachment - or, if using a hand-mixer, in a large bowl - combine the cream, sugar and vanilla and beat on medium to medium-high speed until medium to stiff peaks form, about 5 minutes.
Run a butter knife around the short ends of the pan (the ones without the parchment overhang) and, holding on to the parchment overhang, lift the cake out of the pan.
Place the cake on a rectangular serving platter or cutting board. Because it's nice to slice the cake through the rows of holes, for optimal berry exposure, eyeball where the holes are (or make tiny little marks with a paring knife,) before generously frosting the top of the cake with the whipped cream, leaving the sides naked. Drizzle some of the reserved puree on top of the whipped cream and drag your spoon through it to create streaks. Your goal is a white whipped cream with purple berry swirls
Sprinkle a few blueberries over the cake, if desired, slice along the rows of holes and serve.
Nutrition information per serving (2-by-3-inch slice of cake) based on 16 Calories: 292; Total Fat: 25 g; Saturated Fat: 12 g; Cholesterol: 93 mg; Sodium: 314 mg; Carbohydrates: 40 g; Dietary Fiber: 1 g; Sugar: 33 g; Protein: 4 g
This analysis is an estimate based on available ingredients and this preparation. It should not substitute for a dietitian's or nutritionist's advice.
From food writer Jessie Sheehan
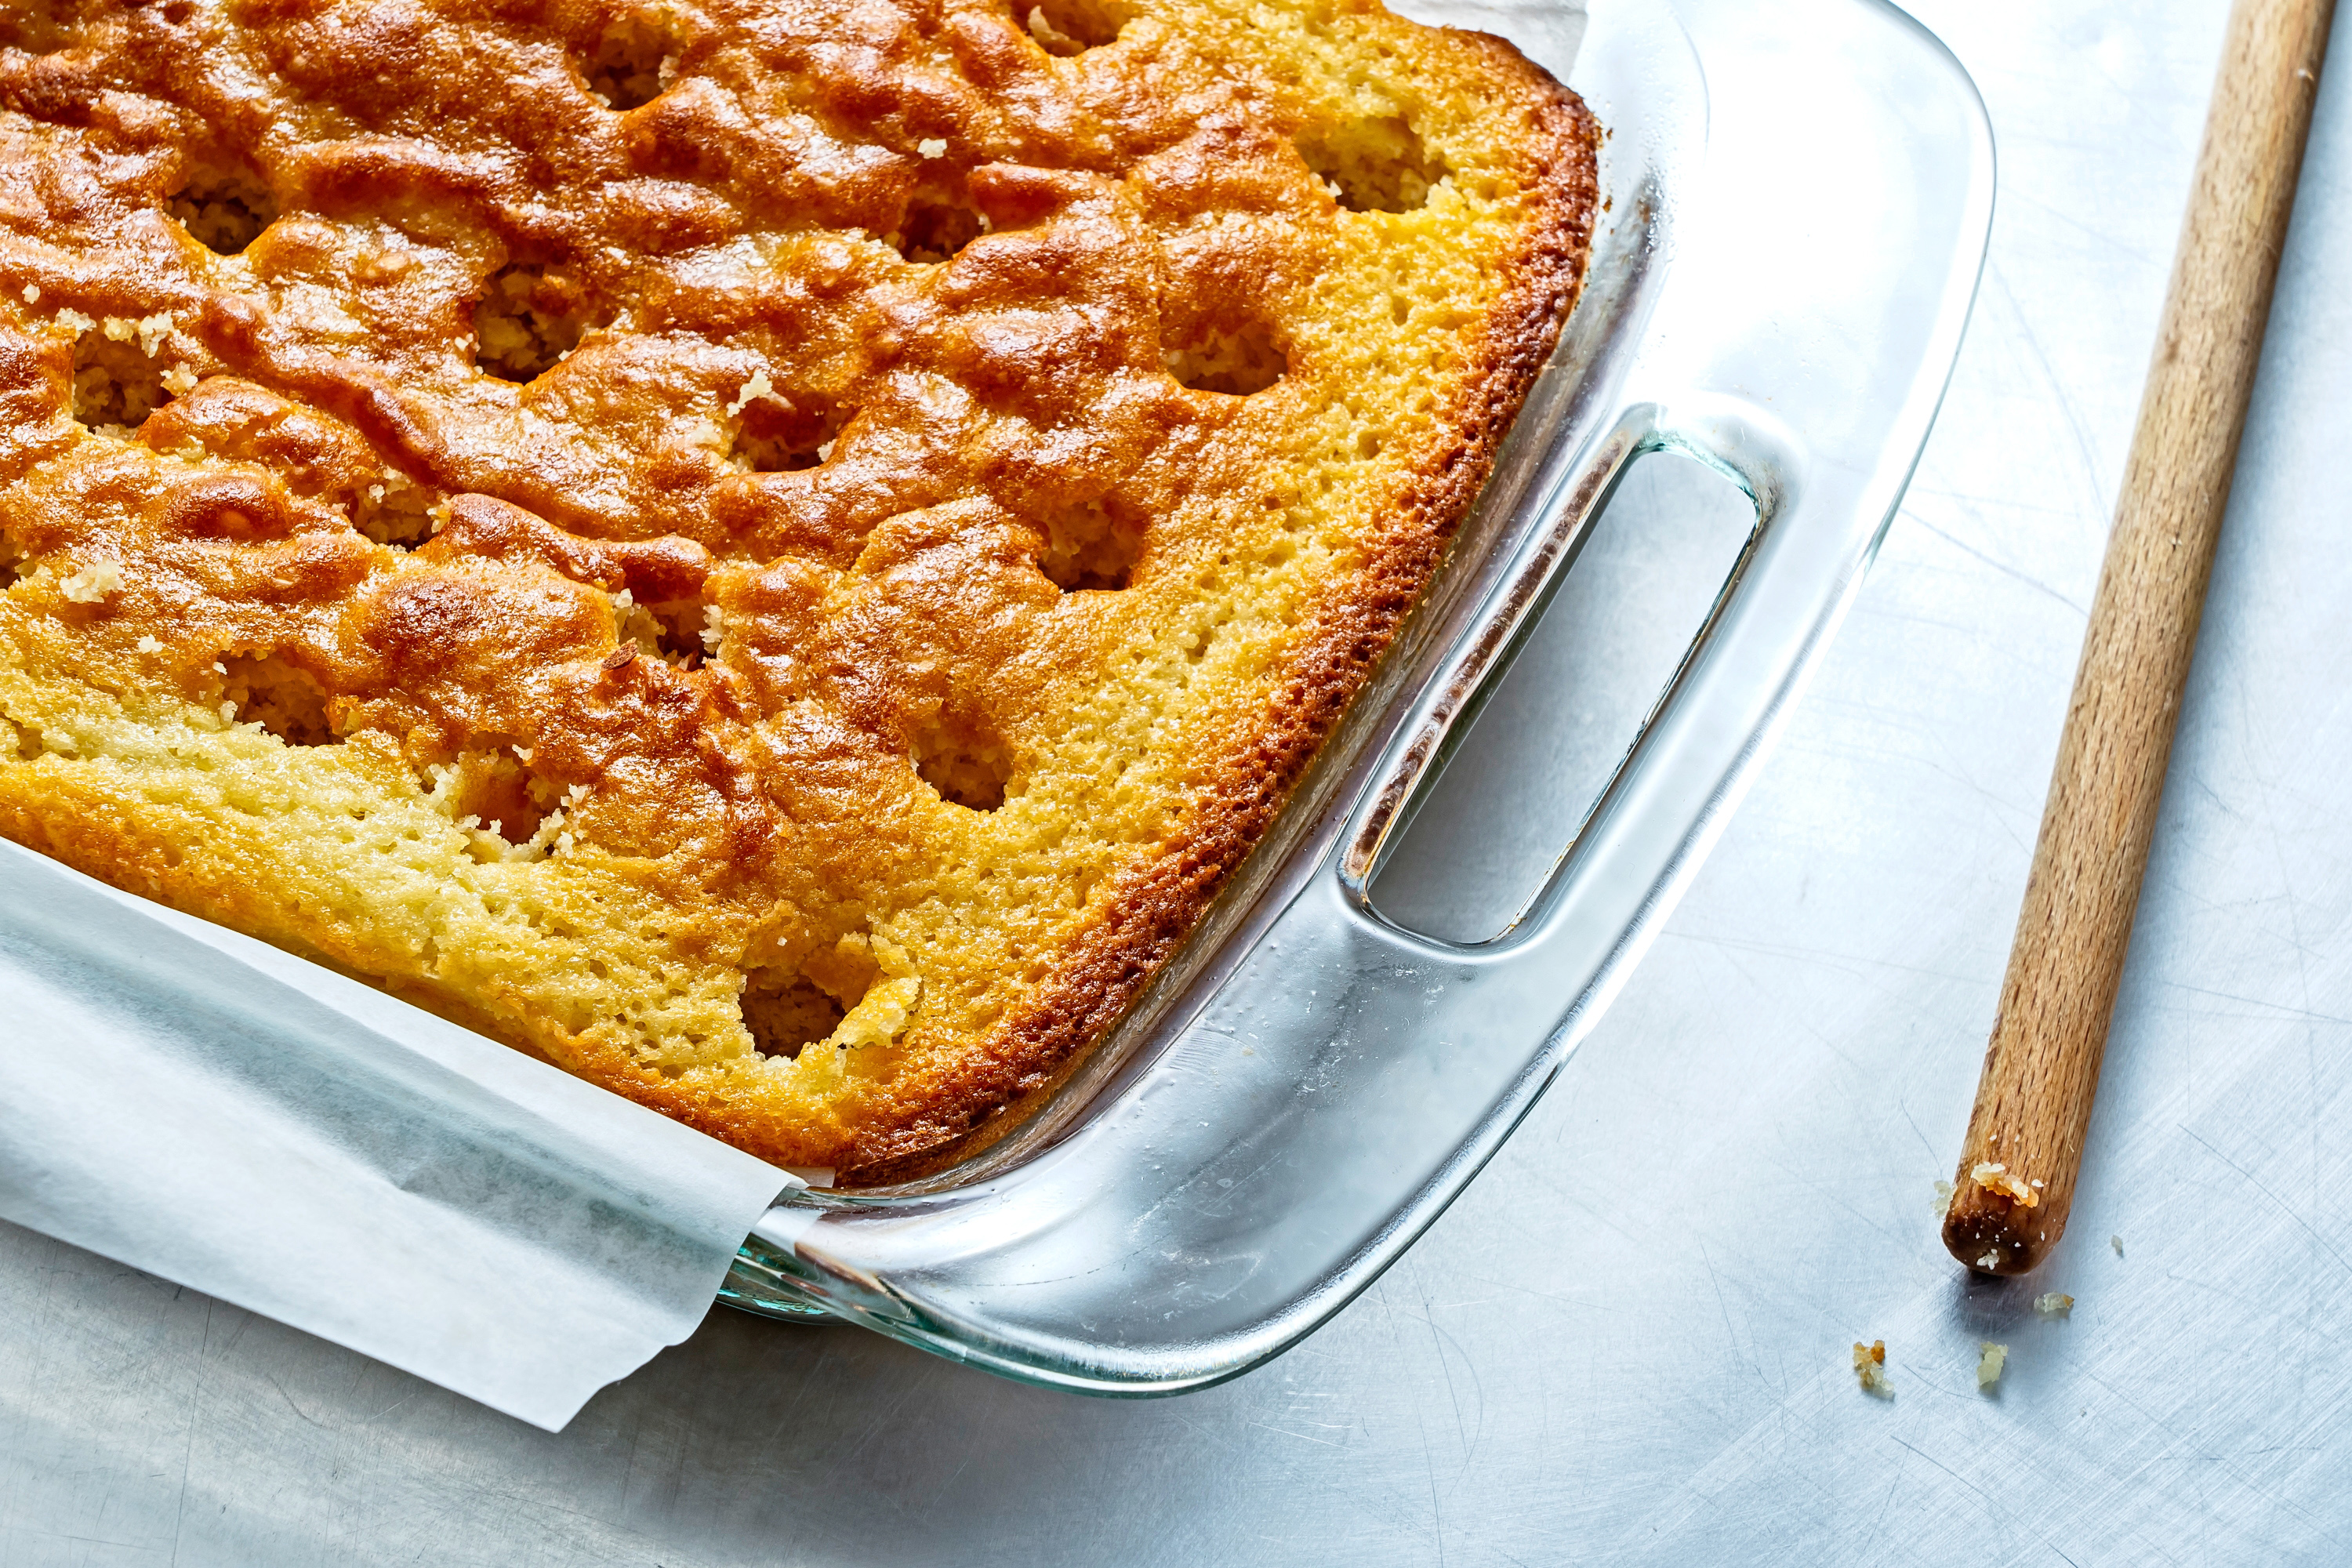 Your poking utensil - ideally the end of a smooth-handled wooden or silicone spoon with a diameter of 1/4- to 1/2-inch - should be round, not flat. MUST CREDIT: Photo by Scott Suchman for The Washington Post.